Set Up Mosaic - DP 11
Using the DP 11 mode allows to use the DISPLAX TILE internal videowall processor.

In the below example we are covering the steps for a 6 x 1 video wall, arranged in 6 vertical columns, and 1 horizontal row.
Since each TILE has a resolution of 1080 x 1920, the total resolution of such a video wall will be (1080 x 6) x (1920 x 1) = 6480 x 1920
Requirements:
- 3 Branches of 2 daisy-chained TILES
- Graphics card or device capable of supporting the setup
- Screen Control Software
- DP 11 mode selected
- RS232 Daisy-chain connection

It is necessary to connect the TILEs via daisy-chain mode with RJ45 / Ethernet cables, more details here:
Steps:
1. Connect all the 6 Tiles in 3 branches of 2 units each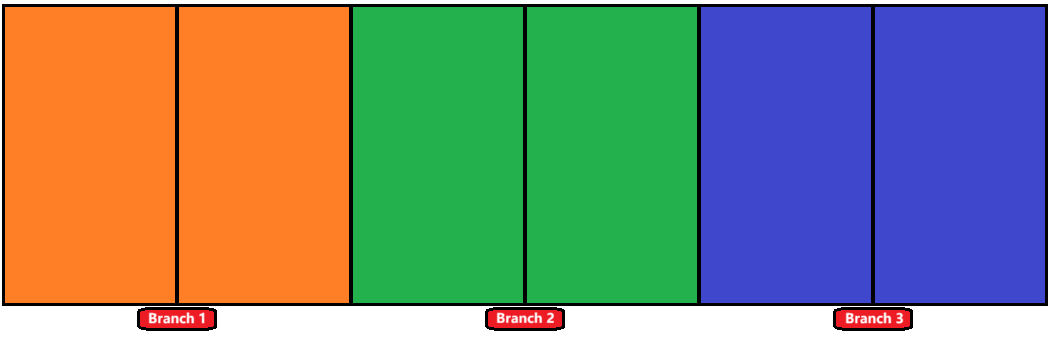
You may create different custom resolutions, according to the use case, or application requirements
2. Connect each branch to a GPU output
3. Daisy-chain all the TILEs via RS232 protocol using RJ45 cables - an RJ45 to RS232 adapter is shipped with every TILE - connect it to your PC COM port
4. Ensure the TILE power buttons are ON
5. Turn ON all the TILEs using the Remote Control and make sure the Input Source is Display Port

We recommend using an IR extender, so you don't have to aim the remote control to the back of the TILEs
6. On the TILEs' OSD menu, select Other Settings, then DP Config, and finally DP 11. Check to ensure that the changes are occurring on all the TILEs
7. Launch the Screen Control Software shared by email, or request it via support@displax.com
8. In the upper menu, click on Set (S), then Splice Setting (P)
9. In the Splicing Screen Setting dialog, enter the video wall matrix values and click OK
It is 1 rows x 6columns in our example
Open the RS232 connection by clicking on "Open Connect"
10. Click on Open Connect to open the RS232 connection - the connection icon will change and the rest of the menu items will become available
11. Select Super User mode in the lower left corner. Password: 123321
12. Select the ID Setting tab and click on Produce Identifier
13. A Soft ID will be displayed on each TILE, with parameters which need to be attributed in Screen Control (Defining the physical position of each TILE)
14. With Screen 1-1 selected (upper-left corner), enter the Soft ID in the Identifier1 & Identifier2 fields, the VAddr: and HAddr: values (Vertical and Horizontal position of the TILEs), as displayed on the corresponding TILE, then click Application
15. Select the next screen and repeat the process, until all parameters for each corresponding TILE is entered
16. Divide the video wall into 3 branches: Select screens 1-1 and 1-2, right-click on the selection, and select DP. Repeat the process for screens 1-3 and 1-4, 1-5 and 1-6
Your video wall is now configured so that the operating system detects it as 3 displays
17. If the image is rotated, re-select a branch, select the Screen Setting tab, and rotate it 90º. Repeat the process for each branch
18. Once all branches are displaying as one single display, you need to customize the input resolution of each one in the graphics card Control Panel
19. Use the Set up Mosaic option to merge the 3 branches into a single display, then perform the Bezel Correction
20. The Bezel Correction can also be performed in Screen Control, select Tool (T), then Frame Effect (K)
Related Articles
Set Up Mosaic using NVIDIA
Creating a Video Wall Mosaic with DISPLAX Tile When using multiple DISPLAX Tile units together, you can merge them into a single large display (mosaic) using your graphics card control panel. This allows the operating system and applications to treat ...Daisy Chain up to 6 TILE units from 2022 onwards
It is possible to daisy chain up to 6 TILE units to connect to a single DP port with TILEs produced from 2022 onwards. Click to enlarge In the image above we have a video wall consisting of TILEs in 1 horizontal row, and 6 vertical columns. The TILEs ...DisplayPort
Selecting DP 11 or DP 12 The DISPLAX TILE has 2 different Display Port protocols available. Each of them offers different solutions for videowall mosaic setups. The available protocols are DP 11 and DP 12. To select either protocol, access the ...RS232
The TILE is equipped with the RS 232 communication protocol. This makes it possible for multiple TILEs to be daisy-chained via an RJ45 cable, allowing for controlling all linked TILEs' settings simultaneously. Using the TILE's remote control will ...RS232 Commands List
RS232 Packet Format: Header Monitor Addr (First) Monitor Addr (Last) Command1 Command2 Checksum In detail: Number of Field Name of Field Power On /Off Settings Signal Source Settings Data1 Header Header = 0xD5 Header = 0xD5 Data2 Monitor Addr (First) ...